Video
You may already watch it while it is loading. Next to the Preview button, the autosaving process will begin.


To see what the supported formats are, view the help article on the Image, audio and video requirements.
If you prefer, instead of using an external video resource, you can record your own video. Learn more about screen casting and webcam recording in this article.
You can also create a video with an AI avatar. Learn more about avatars in this article.
Video cover

You can configure a cover by choosing a color, gradient or an image. All the options and filters that you see on the image resource can also be applied to the cover.
Bear in mind that if you have started to play the video on the slide, you won’t be able to see the cover’s settings. To be able to see the settings you must pause the video and set the play bar back to the beginning.
Video title
Advanced options
In the advanced options you will find a number of settings for the specific behavior of the video and also for the controls.

You will see that the option to show video controls is enabled by default and the option to block forward motion is disabled.

With the option to show video controls enabled, you can block or allow the preview.
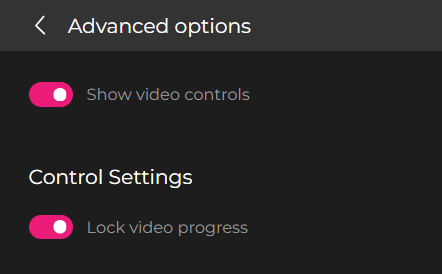
You can combine these properties in four different ways:
- Show video controls + Allow progress
- Hide video controls + Allow progress
- Show video controls + Lock progress
- Show video controls + Lock progress
With the sequential mode, the videos configured with the progress lock must be displayed at 100% to consider the interactive element completed. Those that do not have this option configured and have freedom of progress will have to be displayed at 80% to consider the interactive element completed.
Please note that in the Safari browser, the use of this new “Lock progress” property will pause the video on each attempt to move forward or backward in the progress bar.
Autoplay
You can enable autoplay in your Classic courses so that the video starts playing when you access that slide and you can create more dynamic courses.
Please note that this option is not guaranteed to work in all browsers or on mobile devices.
VTT subtitle content
If you want to add subtitles to your audio, the way to do it is by copying the contents of your subtitle VTT file to this text field of the audio editor.

To learn more about the VTT format, consult the article on Requirements for VTT subtitles.
Editing Video in accesible mode
- You can assign a title by choosing from the different headings, so that your students can identify the video. Try not to repeat this title in the project section.
- Add an Alt text and a long description if it is relevant to your cover image in the Video.
- Add a transcript where appropriate. This text should be descriptive and you can make it more useful with formatting and adding captions, for example. You can learn more about this according to WCAG here.

Functionalities not supported in Accessible mode:
- The "Show video controls" functionality is not allowed in Accessible mode. Please note that even if you disable it, the video controls will always be visible in the accessible mode of the course.
Continue reading Types of elements